Intro:
Hello! My name is Maggie Nielson and I have been working in Danish bakeries and going to baking/pastry school for the past 3 years years. When I first moved to Denmark and began my baking journey I learned sooo much about bread. I found out that there was an abundance of things that I did not know about the bread making process; from the ¨correct¨ order of adding the ingredients to knowing when your bread is finished baking, I was shown and taught by the bakers I was working with and the teachers at school.
As I began to feel a little more confident and was learning more diverse things, I really just wanted to share the knowledge and skills I was learning every day. I started joining social media groups for baking and even started trying to help people when I felt I had information they could use. Some of the most frequent questions I see is ¨What did I do wrong with my bread?¨ and ¨Why does my bread not turn out the same every time?¨ So I started messaging these people and trying to help them with a list of all of the basics of bread making that I have learned and use every time I make bread both at home and at work.
There are quite a lot of things I will be mentioning and eventually I will also attach a YouTube video to show exactly what I am talking about through this blog post. I will do my very best to keep things as correct as possible, but I cannot promise it will be fail proof; the point of this post is to help others in their bread-making journey by sharing the information and knowledge I have received so far. Please feel free to send me a message or comment below if there are any questions, concerns, or even tips and advice that you think might be useful. I hope you enjoy this post and that it helps with your bread making journey!
Here are two links to some basic bread recipes that I use often.
Grandma's Dinner Rolls - A recipe that was given to me by my grandmother and is very loved on Thanksgiving Day. It is a milk based recipe and is great for not only rolls but also a loaf of bread.
Danish White Bread - This is the most basic bread recipe and also one of the most popular breads found in many danish bakeries. This recipe does not contain any milk and can also be used for rolls and not just for a loaf.
Below I have provided a table of contents to help navigate this page. This is to help readers be able to come back to reread as needed and to also be able to see what is covered and what tips and information might interest them. I hope this helps!
Table of Contents:
1 - The ¨Correct¨ Order to Add The Ingredients
2 - How Long to Mix/Knead The Dough
3 - How To You Know When The Dough Is Finished Mixing/Kneading
4 - Always Let Your Dough Rest
5 - How to Shape Your Dough
6 - How Long to Let The Dough Rise/Proof
7 - How to Know When Your Dough is Finished Rising/Proofing
8 - Shiny or Dull Crust
9 - Know Your Oven
10 - How to Know When the Bread is Finished Baking
11 - Storing Homemade Bread

1. The ¨Correct¨ Order to Add The Ingredients
The reason why I have put quotations around the word correct is because this is not something every baker does and not even I do it every single time. This is just the way that we are taught in school AND it is also important to know if you are struggling with consistency in a recipe and are trying to understand what is happening. Depending on your dough, the order of ingredients can be very important. Typically, it is more important to focus on the order of ingredients with a wet dough (like ciabatta) than with a drier dough (like classic sandwich bread).
Whatever your bread recipe, here are some things to know:
1. Wet ingredients are best added first because then you have a better chance of all of the dry ingredients getting fully incorporated and no patches/pockets of dry ingredients being stuck on the bottom of your mixing bowl.
2. Yeast feeds on sugar, so it is beneficial to add your sugar (or honey) and yeast together.
3. Salt and fat inhibits/restrains the yeast so it is a good idea to not let fat or salt touch the yeast directly, when initially adding the ingredients together.
- Due to this fact, it is also recommended to add the fat (butter or oil) after the dough has initially mixed together for a few minutes on low. That way the yeast has been fully incorporated before your add the fat.
* Further explanation will come about how yeast works and what hurts and helps it in another blog post about the science of yeast.
4. If you have a high hydration dough (a ¨wet dough¨), do not add the salt and about the last 1/4 of the amount of water until after the dough has mixed together for at least 5-10 minutes.
- Adding the salt later helps with the elasticity of the dough.
- Adding all of the water at once will make it significantly more difficult for your dough to mix together thoroughly due to it not being able to stick to the sides of the bowl and thus make it take much longer. It is recommended to not only add the remaining water later on in the mixing process, but also to only add it a little bit at a time.
So, when testing a new dough at home, this would be the order of ingredients:
1. Water/Milk
2. Yeast
3. Sugar
4. Flour
5. Salt
6. Fat (after the dough has mixed on low for no less than 5 minutes)
*Obviously not all bread has all these ingriedents, some have more, some have less, but that just gives you an idea.
Important:
- When adding seeds to a dough, for the best results, make sure to add them in the last couple of minutes of mixing. The seeds have sharp edges on them that can hurt the gluten development in bread dough by cutting the long gluten strands into shorter strands.

2. How Long to Mix/Knead The Dough
The amount of time it takes to mix your dough is dependet on a lot of things but the two most important are: (1) What type of dough you are making and (2) If you are using an electric mixer or your hands.
For Electric Mixers:
- Most types of dough should be mixed on both low and medium speed.
- The exception to this would be danish pastry dough and most dough that needs to stay cold when working with.
- As a general rule of thumb, the dough should mix on slow speed for at least 5 minutes before increasing the speed to medium.
- For most bread dough I recommend beginning with a basic 10 minutes of mixing time, 6 minutes on slow speed and 4 minutes on medium speed.
For Hand Mixing:
- The amount of time it takes for a person to mix by hand is largely dependent on the person mixing, their technique, and how fast they are at mixing and kneading the dough.
- When I mix/knead dough by hand, it takes me a minimum of 15 minutes, but often longer.
- The important thing is that you use the next tip to know when you are finished kneading the dough by hand.
3. How To You Know When The Dough Is Finished Mixing/Kneading
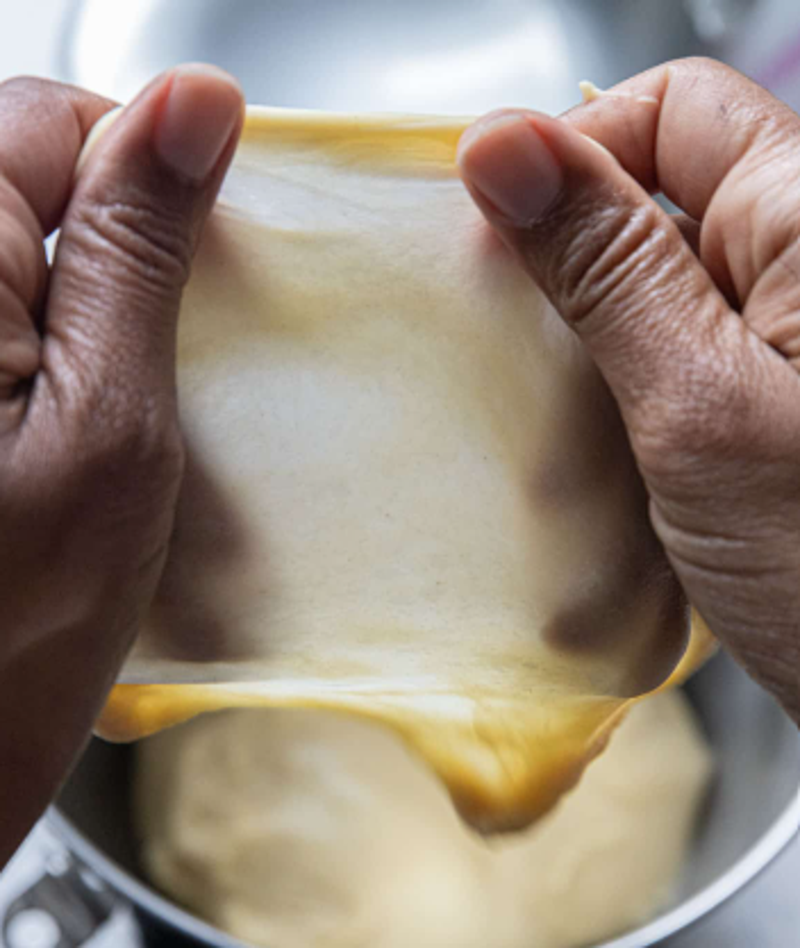
One of the first things I was taught in a bakery was how to do a Gluten Window Test (this is what the picture shows above).
Gluten Window Test:
- This is something bakers do to check the development of gluten in their bread; this test will let you know when your dough is ready and you can stop mixing or kneading it.
1. Remove a small handful of dough from your dough.
2. In a circular-like motion (like you might with a pizza dough), slowly and lightly pull from the center of the dough clump and out to the edges.
3. Continue this motion until your dough is as evenly stretched out in the center as it can be and it is shaped like a square.
4. If the dough stretches even and thin and looks something like a window that you can almost see through, it is ready.
5. If the dough rips before it is able to stretch out like a window, it is not ready and should continue to mix on medium speed for at least 2-3 more minutes.
There are some things that are good to know when performing this test:
- Dough that has milk in it is very unlikely to stretch completly even and will not stretch as thin when doing the gluten window test. Most of the time, there might be some imperfections that look like veins or webs in the dough window, but you should still be able to see light throughout the majority of the window.
- The higher ratio of water to flour (higher hydration), the thinner the dough can stretch and the more see-through the window will be.
- If you are making a bread with seeds in it, the dough will also often not be able to stretch as thin due to the sharp edges on the seeds that cut the gluten strands shorter when mixing.
- As a general rule, higher protein flour (bread flour) will make it so your dough can stretch thinner and farther before ripping than normal flour (all purpose flour).
Dough Temperature:
- There are times when I make a recipe and sometimes it takes 30 minutes to rise and other times it takes 90 minutes to rise. This is almost always due to the temperature of the dough after I have finished kneading/mixing.
- Yeast is the most active at around 25*C (77*F), so naturally, we want the dough's temperature to be at about 24-26*C (75-79*F) in order to have consistent proofing (raising) time every single time we make bread.
- Typically if you can achieve the gluten window test, the dough temperature will be around 25*C (77*F), however, this is not always the case, so I recommend making it a habit to always check the temperature before you stop the mixing/kneading process.

4. Always Let Your Dough Rest
No matter what type of dough you are making, let it have time to rest for at least 15 minutes, covered in a cloth or plastic.
- This allows the dough to relax before you shape it. It also allows the yeast to begin eating the sugar, which forms CO2 and causes the dough to raise and be easier to work with.
- If you do not let the dough rest, it will have a much higher chance of ripping/tearing and the end product will not be as uniform and nice.
Every recipe is different. Most recipes will tell you how long you should let the dough rest for, but no matter what, let the dough rest (even if it is a dough without yeast).
Tip:
Sometimes when you are shaping the dough or rolling it out, the dough rips and it looks pretty bad. That is okay, all is not lost; simply shape the dough into a ball or square and let it rest for 15 minutes more, then try to shape it again.
5. How to Shape Your Dough
I can honestly say that I do not believe there is a right or wrong way to shape your dough. Everyone has different ways of doing it. All I can do is teach you the way that I have learned and explain why I do it this way.
Different Techniques:
- The type of shape you are aiming for and the type of bread you are making will depend on the technique you use. However, no matter what type of bread I am making, I hardly ever use a rolling pin. The only time I will use a rolling pin is if I am purposely trying to make a spiral in my finished bread.
*Obviously, you are more than welcome to use a rolling pin and simply fold and roll. That is perfectly fine, I will just share the ways I have been taught to shape bread.
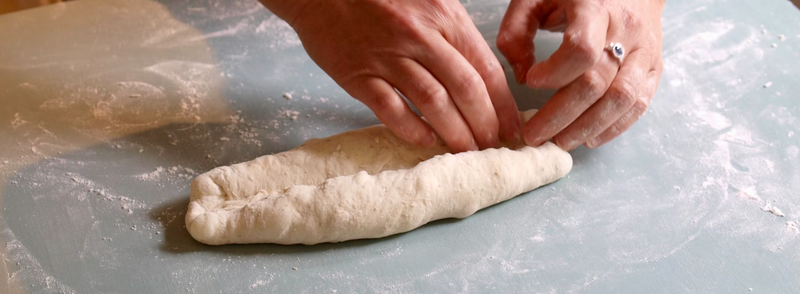
Basic Bread Loaf (sausage shaped) - (Video Demonstration)
For a basic bread, in or out of a bread pan, shape it as follows:
1. Lightly flour the surface you are using.
2. Put the dough on the floured surface.
3. Press the dough out evenly so it is flatter with fewer air bubbles and the dough is in a circular-like shape.
4. Pull the top 1/3 of the dough down over the center of the dough and press it down with the palm of your hand or finger tips.
5. Pinching the two sides of the dough, stretch the sides in opposite directions then fold them over the center so that they are slightly overlapping in the center of the dough and on top of the previous fold.
6. Using the palm of your hand, press the dough down evenly across the center so that the two new folds do not pull apart and it is still flat.
7. Pull the bottom 1/3 of the dough up and just below the center of the previous folds.
8. Using the palm of your hand, press the dough down across the seam of that new fold.
9. Roll the top half of the dough down so that it covers the seam of the previous bottom fold.
10. Using the palm of your hand, press the dough down across the seam of the new fold and into the remaining flattened dough at the bottom.
11. Roll the top of the dough on top of the bottom flap of dough and using your palms and a thumbs, push the dough into a tight sausage (rolling and pushing to lengthen it as needed to fit the shape of the bread pan).
12. Flip the dough over so you can see the seam on the bottom and, if it is needed, pinch the seam tightly together so that it closes completely.
* For the YouTube video demonstrating this, click here.
Round Bread Loaf - (Video Demonstration)
This is typically without a bread form and just put on a pan or parchment paper.
1. Lightly flour the surface you are using.
2. Put the dough on the floured surface.
3. Press the dough out evenly so it is flatter with fewer air bubbles and the dough is in a circular-like shape.
4. Grab each side (we will say there are about 4 sides even though it is a circle) and fold them into the center while pushing them down into the center of the dough so that the dough makes a square like shape.
5. Take the four corners of the square and do the same (pulling the corners into the middle and pushing them down).
6. Flip the dough over so that the seams are down and the smoother side is on top.
7. Take both your hands and place them in a v-like shape at the top sides of the dough while also letting your pinkey come slightly under the dough ball.
8. Moving both of your hands similtaniously, while keeping your hands in the v-like shape and your pinkeys slightly under the dough, move both of your hands in a circular like motion slightly smaller than the size of the dough itself.
9. The idea of doing in this way is that while you circle your hands with the dough that your pinkey fingers help to tuck the dough in under itself and the dough ball becomes a tight round ball with only a reletively small seam on the bottom.
* Click here to watch a video showing how it is done.
Classic Dinner Rolls - (Video Demonstration)
This is very similar to the round loaf, but on a much smaller scale using only one hand.
1. Portion out your dough into smaller sizes (I typically do 70g-100g per piece) so that each piece can fill your cupped hand.
2. On a very lightly floured surface, place one of your dough pieces.
3. Place your hand flat on top of the dough piece, let your fingers fall down so your finger tips touch the table (like you would place your hand on a computer mouse), then cup your fingers so that the very tips and maybe even your finger nails are touching the table (I often shift between finger tips and finger nails touching the table depending on how the dough is responding).
4. Take your hand and move it slightly so that it slants over the dough with the outside corner of your palm touching the table (once again, like it would when using a computer mouse).
5. Being sure to keep a light but firm pressure on the dough, move your hand in a circular motion so that your fingers naturally push the dough in under itself and cause the dough to ball up into a sphere with a smooth top.
6. Do the same with remaining dough pieces (You might not even have to flour the table. You want the dough to stick ever slightly to the table so that it is able to ball up under itself).
* Click here to watch a video showing how it is done.
* There are other types of dough and other ways to shape it (pastry, ciabatta, baguettes, pizza, flutes, foccacia, and various types of sourdough, to name a few), but I will just mention these 3 ways for now since we are only talking about the basics. If you would like a video or tutorial on how to shape other types of dough, send me a message and I would be more than happy to help!

6. How Long to Let The Dough Rise/Proof
There is a lot of variance between the different types of breads, and much of it is learned through practice and experience. A typical white bread dough can take as little as 30 minutes while a sourdough bread dough can take up to a couple of days to raise. However, these are just the basics, so we will just talk about the easier doughs like white bread and other breads with a similar consistency.
The Importance of The Environment (Temperature/Humidity)
There are two factors that affect the raising time and outcome the most: temperature and humidity.
- At room temperature (20-23 *C or 68-73 *F), most basic doughs will take between 45 minutes and 1.5 hours to raise completely.
- Yeast hybernates at below 5 *C or 41 *F, is the most active around 30 *C or 86 *F, and it decreases in activity at around 45 *C or 113 *F.
- Knowing this, typically, I raise my dough between 30-35 *C.
- At this temperature, basic bread dough usually takes about 30 minutes to rise.
- Humidity is also something that affects how your dough rises, however it has nothing really to do with the yeast but has an affect on the "prettiness" of the bread.
- When dough rises in a open or higher airflow enironment, the dough dries out and creates a dry crust on the parts of the dough that are exposed to the air. This does not matter so much when you are letting the dough rest for the first time and are going to shape the dough and make it so the dry spots are not visible. However, for your final "proof" or rise, it can greatly affect the finished look of your bread because the top of the dough cracks easily when it dries out while rising.
- To create humidity at home, the best way I have been able to find is to simply cover the bread with plastic; the bread releases moisture and it stays trapped in the plastic. The tricky part, though, is to make sure the plastic does not touch the dough or it often will ruin the dough when you remove the plastic before baking. I honestly haven't figured out a fool proof way of doing it at home, but I am working on it! In bakeries we have a proofing cabinet that helps tremendously with regulating humidty and temperature; I have been turning it over in my brain to figure out how to make a home-sized proofing cabinet that is collapsible and affordable...I guess you'll find out when it becomes a real thing because I will attach a link to this post!

7. How to Know When Your Dough is Finished Rising/Proofing
* I could not find a picture that I could use for this post, so if you just google "bread poke test", it will show you what it looks like.
There are different ways to check to see if your dough is finished rising. However, for the sake of ease and consistency, I will just mention the way that I was taught and use.
Poking the Dough
- This is literally as simple as it seems, you simply poke the dough. BUT, don't poke a hole in the dough! You just push a finger print onto the dough so that it makes a good indent, but doesn't break the surface.
- From here, the dough will "tell you" if it is ready.
- If the dough springs back almost immediately and you can hardly tell that you poked it, it needs more time.
* Baking the dough at this point will often result in more dense and sometimes even gummy like bread texture. The bread will often become deformed while it is baking due to the excess energy that remains in the dough when it begins to bake.
- If the dough springs back very slowly and leaves minimal evidence that you even poked it, it is ready to bake.
* Baking the dough at this point should result in a porous bread that has a very uniform shape.
- If the dough does not spring back at all and just leaves the indentation made, it has been raising for too long; you can still bake it, but take note for next time so you can check it earlier.
* Baking the dough at this point will result in a more dry and flatter bread.
A lot of times in a recipe, it will say that the dough is ready when it has doubled in size. That is not always true, it really depends on the dough. I have been surprised time and again when I have made a recipe and the dough hardly rose at all or sometimes the dough has risen way more than expected. So, generally, I would say that waiting for the dough to double in size is not a fool-proof way of knowing when the dough is finished rising.

8. Shiny or Dull Crust
How to create a shiny or dull crust is not something that many people even think about in the beginning of their bread making journey, but I think it is good to know.
There are a couple different ways to achieve a shiny crust on bread, but let me quickly explain how and why it even happens.
What causes a crust to shine in the oven?
- Simply put, water. When water comes into contact with the crust of bread dough during the first 1/3 of the baking time, the bread will develop a glossy or shiny crust.
Why does this happen?
- When water comes in contact with the crust of dough, it causes the starches on the surface of the dough to geletanize which creates that shine.
How to achieve the shine
- There are two simple ways to acheive this, (1) by directly putting water on the surface of the bread or (2) by creating steam in your oven to do that for you.
- Some ovens have a steaming function, but most home ovens do not.
- There are three ways I have used to create steam in my oven at home that seem to work the best:
1. By baking the bread in a crock pot (or something similar) with a lid on it. The steam will escape from the bread naturally and the pot will contain the steam it releases.
2. By adding a large oven safe pan (I recommend aluminum) to the bottom of your oven while it is preheating and then adding a cup of water to it as you place the bread in the oven. To make it even better, you can add rocks to the pan as well, but make sure the rocks are clean and are safe to use (I have used lava rock before).
3. The last way is the most simple way, it is to simply spray the bread before or during the baking process. I have honestly not noticed a difference in the bread when I simply spray the top of the bread with a spray bottle and water vs. spraying it inside the oven and getting water not just on the bread but all over the oven. The only difference is the cleanliness of the oven; it becomes more dirty inside when you spray the bread while inside the oven.
Does a shiny crust affect the flavor of the bread?
- No, it does not. The flavor is not affected by adding steam to the bread, but the texture of the crust is affected.
Is it possible to get a shiny crust after it has baked without steam or water?
- No. But, that doesn't mean you still can't make it pretty. Many people who have baked at home and were taught by their mothers or grandmothers know that it is common in the American kitchen to add butter to the tops of your dinner rolls or a white bread loaf right after if has come out of the oven. This is the only thing I know of to create a shine to the crust after it has baked. It will also soften the crust and make it slightly salty (if you use salted butter). And there is nothing wrong with that if that is what you want!

9. Know Your Oven
Oven Temperature
- Most ovens are not actually 100% acurate with their temperatures. The oven I use every day is off by 20 *C...that is a lot!
- I strongly encourage purchasing an oven thermometer so that you can see how hot your oven actually is.
Type of Oven
Another thing that I think is also important to mention quickly is to know the type of oven you are using.
- The two most common ovens are convection and conventional.
- Whether one is better than the other, that is not the question, but it is just important to note that there will be differences in the look of your bread and the time it takes to bake. This is due to heat distribution and air circulation.
- A conventional oven is also what some might call a "basic" oven. It typically has 1 or 2 heating sources and they are typically located on the top or bottom of the oven.
- This type of oven might take a little bit longer to bake the bread and will also not cause your bread to spring up as much as a convection oven due to the less even heating element.
- A convection oven is an oven that circulates air around inside it with a fan.
- Due to the very even heating, bread often bakes a little bit faster in this type of oven and it often time springs up and even opens or tears the bread a bit when it bakes. For this reason, I more frequently score (or cut the top of) my bread when using a convection oven.
There are also other types of ovens that work great as well, but we will just leave it at those two for now.

10. How to Know When the Bread is Finished Baking
Okay, this is literally one of the easiest things in the world, but so few people know it. I am so happy to finally make it public knowledge on this post because I get asked about it all the time.
Tap on the Bread
This is so easy but yet, so difficult to explain completely without showing you how it looks and sounds.
- To know if any bread is finished baking all it takes is to simply tap on the bread. The best place to tap is on the bottom, however, always tap on both top and bottom to compare; they should sound almost the same.
1. Pull the bread out the oven.
2. Quickly but firmly, tap on the top of the bread with the tip of your finger or finger nail (depending on how hard the breads crust is).
- You should hear a hollow sound that sounds like a lower version of tapping on the window, wall, or on a spring mattress.
3. Flip the bread over (I recommend using oven mits or a cloth for this), take it out of the form (if using a bread form) and tap on the bottom.
- The bottom should sound quite similar to the top. If it does not sound very hollow and sounds more like a thud, put it back in the oven for 2-5 minutes at least.
* When you are making bread that is particularly soft on the bottom (typically that contains milk or has been in a form), it easier to hear the hollow sound by literally slapping it with the tips of your fingers rather than tapping it. soft bottom bread also sounds much more like slapping a spring mattress than a window (just so you know for comparison. And yes, I did go around my house slapping and tapping everything while holding my freshly baked bread. Suprisingly, the sound of our mattress sounded very similar to the sound of slapping the bottom of the bread).

11. Storing Homemade Bread
After you have finished baking bread, if you have not eaten it all in one day, it is a good idea to look into different ways to store it, based on your needs.
Porous Material
- In a bakery you will often get your bread served to you in a paper bag or something else that is porous. This is because porous materials help the bread to breath and, as a result, the bread can keep its harder crust.
- It is totally okay to store your bread in the bag you have been given by the bakery or to put it into something else that is porous, however, just know that this also enables the bread to dry out pretty fast.
- After 24-48 hours it will not just be the crust that is dry and hard, but the inside of the bread will also become quite dry as well.
Airtight Material
- When you buy bread from a grocery store, it often comes in a sealed plastic bag because bread simply lasts longer when stored in an airtight material.
- Once the bread has been sealed in an airtight material, the crust will become soft and chewy (the amount depends on the type of bread).
- This happens even after the bread has completely cooled off.
- This is why bread that is from the grocery store is always softer, while bread that is fresh baked from the bakery is often more hard on the outside.
Room Temperature
- Many people store their bread at room temperature in a plastic bag. The bread will not change much in texture (aside from the crust) and is very easy and convenient to store this way.
- Just know that homemade bread does not last as long as store bought bread, so at room temperature homemade bread will typically be safe to eat for up to 4 days.
In the Fridge
- Another common way to store bread is in an airtight material in the fridge.
- Homemade bread, stored in the fridge can typically last for up to 1 week or even slightly more. However, storing it in the fridge also dries the bread out a bit and changes the consistency of the bread.
In the Freezer
- The last way I recommend storing your bread is in the freezer.
- This should also be done in an airtight container/material.
- If you choose to store it in a porous material, the bread is much more susceptible to freezer burn and will not last as long in the freezer.
- Homemade bread can typically last up to 3 months in the freezer.
- The beauty of storing bread this way is that it lasts so long and you can even take it out slice by slice so that you do not waste very much bread, however, the bread does need adequate time to thaw completely.
- If allowed to thaw for a few hours at room temperature, in plastic, the bread will be almost as good as it was when it was fresh baked and put in an airtight container.
Conclusion
Well, that is all I've got to share for now on the basics of bread making.
As mentioned before, please feel free to comment or contact me with any questions or suggestions. I hope you enjoyed this post and I hope it helped you learn something new!
I will try to add a video to demonstrate as much of these tips as I can so that it is more understandable. Stay tuned for more!
Add comment
Comments